Wednesday, December 29, 2010

Another CSN Stores Giveaway... $45!!!

UPDATE.... COLLEEN IS THE WINNER OF THE GIVEAWAY!
I am in love with CSN stores….and they are offering yet another giveaway for $45.

CSN Stores has over 200 online stores where you can find anything you need whether it be a chic handbag, modern dining furniture or even cute cookware! I love browsing all their sites.I love browsing all their sites.

I have ordered several things from CSN and must say they have so many great options.
If I was the one that won I think I would order some Kettle Bells… LOVE those things
…So… the important part… TO ENTER….
Just leave a comment telling me what you would use or put the $45 for…
and leave your email address!
Giveaway ends January 7th!
{please note this will not cover international fees}

Thursday, October 28, 2010

BAKED CARAMEL APPLES

Apples are not my thing. Never have been.
Caramel, now thats my thing.

You will need:
Apples
Chopped Nuts (any kind)
Bits of caramel
Butter/Margarine


Step 1.) Cut the top off the apple hollow it out and remove the core & seeds.
Step 2.) Fill the apple with nuts & caramel. I used chopped walnuts on these, which are fine, but peanuts would work better. Especially if you aren't the biggest fan of walnuts (me). I
also used regular caramels that i had, and just cut them into 1/4ths. Caramel chips
would be fine.
Step 3.) Put a dollop/slice/dab of butter on top of the walnut/caramel mixture. Butter makes all
things delicious.
Step 4.) Bake at 350 degrees for 30-40 minutes

Voila!
(sorry for the poor picture quality & the child bathing in the background)


At this point I decided to take the deliciousness to a whole other level and sliced the apple open and added a little brown sugar & cinnamon. It was a decision I did not regret.

So good, so simple, plus you get your apple a day in!!

Sunday, October 3, 2010

And the WINNER is....

There were 24 entries....
and the winner is....
Congratulations Melanie!!!!
I am sending your information off to the CSN Store rep and they should contact you soon!!!

Thanks to all who entered!

Thursday, September 23, 2010

Did you do it???

Umm if you did not enter giveaway below....you need to!
and if you didn't go to the other blog and enter as well....

Well YOU SHOULD!!!!

Because you need to comment on each one...they are SEPARATE Giveaways!!!Click the pic...it will take you right there...

HAPPY FRIDAY!!!!

(almost)

Tuesday, September 21, 2010

CSN Stores GIVEAWAY!!!


CSN Stores has over 200 online stores where you can find everything from a nesting tables to fantastic fitness equipment to cookware!
I LOVE CSN STORES!!!!
(I got my food dehydrator from them)
I had such a great experience!!!
CSN Stores is graciously offering an Oh Snaps reader
a $45 gift card...
ALL you have to do is leave a comment with your email address below and what you would use the giftcard for.
Contest ends Friday October 1st!
(winner announced October 2nd)
P.S. It might be in your best interest to check out my other blog too...(wink wink)

Thursday, August 12, 2010

Covered Letters

This is my go-to bridal shower gift for family and close friends.
I love to make the letters that will spell the couples last name.
This example below is the one's I just made for Jadon and Amanda.
{don't know why I can't turn the picture}
So I get the letters at Hobby Lobby or Michael's
Any wood or cardboard letters work. Find the paper you want. I normally try to coordinate with their living room colors.
I normally alternate a solid and then pattern.
{Honestly picking the paper and laying out the way I want the paper laid out is the toughest part.}
Trace the letter on the paper. Both upside down.
Cut on the inside of the trace. This will save you time in trying to trim down the letter.
Then Mod Podge the paper to the letter.
Put the mod podge on the letter and then lay the cut paper on top.
Smooth any bubbles and let dry.
After it has dried. Take some sand paper and sand down the excess paper on the edges.
Then stain the edges. I normally do brown or black paint {just craft paint}
and mix it with water and use a sponge.
I find a ripped sponge works best {that yellow thing on the top of the plate}
It allows a messier look and gives you more control of what you want to do.
There is no rhyme or pattern to follow.
Just stain the edges. Make it messy.
I don't think there is any way you can go wrong here.

Then do another layer of Mod Podge on the top.
A nice layer works good. It will dry clear.
Once dry you can embellish.
Use buttons, ribbons, brads, beads, gems, whatever you can find.
A nice rule of them is start embellishing the solids.
Then if if you want to you can add a small embellishment to the patterned letters. And there you have it. The final product.

There is no limit to what you can make!
You can spell out anything or just do an initial.
Super easy and fun!!!


Join  us Saturdays at tatertotsandjello.com for the weekend wrap up        party!

Wednesday, August 11, 2010

Call it love, call it an obsession . . .

I call it a new hobby! Digital Scrapbooking. I love it and have spent a lot of time on it recently.

Here's what I learned:

First you need a program. I bought Digital Scrapbook Artist from Costco.


This program comes with a few kits
with digital scrapbook images,
as well as information about Daisytrail.
(Daisytrail is a website for those who love digital scrapbooking.)

Next, you pick a kit (or kits) that follow the theme you want to scrapbook.
pick your background,
materials
embellishments
photos
text
[Digital Scrapbook Artist also has a photo editing tool and lots of effects you can add]


Design it how you want, and you're done. *No Mess to clean up!!!
This is a page I made using Digital Scrapbook Artist.
(The picture was taken by Callie of Callie's Gallery)
Lastly, print your pages.
Print them from home.
Find a store or website that prints scrapbook pages.
I recently ordered from Shutterfly.
Shutterfly can print your pages in a photobook, in lots of sizes.
I was fairly happy with the quality,
but I would recommend that you double check each preview
to make sure none of your text or images were cut off.
More Websites
A word of advice . . .
When I went to upload my pages on Shutterfly,
I learned they needed to be in jpeg format.
In order to get them that way,
I had to export them from Digital Scrapbook Artist.
*make sure they get saved in a file you can find:)

Saturday, August 7, 2010

SALSA!

My first attempt at homemade salsa happened just a few years ago, and I'm sad it took me so long in life to come up with a recipe that I like. But now that I've got it just how I like it, I'll share.

INGREDIENTS:

3-4 Large Tomatoes
1 Green Bell Pepper
1 Red Bell Pepper
1 Yellow Bell Pepper/Orange if available
1 Bunch of Scallions (those are those long green onions)
1 Bunch of Cilantro
1 Jalapeño
1 Yellow Onion
1 Red Onion
1 Head of Garlic
2 Small Cans of Tomato Sauce
Salt/Pepper
1 Large Avocado (optional)
2 Lemons
2 Limes


After I wash everything I start by cutting up the tomatoes, small pieces of course. This is the only thing besides the Avocado that I cut by hand. Everything else i use the food processor to chop up.
So I chop up all the different types of onions. With the scallions I only use the white parts up to where it starts to turn dark green. With the Red/Yellow onion I use the whole onion, but you can put in as little/much as you prefer.
After getting rid of the stem & seeds of the bell peppers they are also chopped and added. I should add that you do not HAVE to add all the different assortments of bell peppers. I just like the color and taste they add.
I chop and add about 1/2 of the head of garlic.
With the jalapeño I advice to to use some caution. Last batch I made I added 1 whole jalapeño and it was almost too hot for me (but i am a big baby). This time I added half of one and while it had it's spicy moments it was a pretty good level of hotness.
Avocado I cut by hand and add in.
Lemons/Limes give it a little zest as well as keep the avocado from turning brown, but you can add as little as you like.
With the cilantro I usually cut most of the top leaves off and chop them up. But some people don't like cilantro, so this could be optional as well.
Lastly I add salt/pepper and the 2 cans of tomato sauce- the sauce helps add juice.

And that's it! The best part about the salsa is how fresh it tastes, and how healthy you feel for eating all those vegetables.

This recipe makes A LOT though, so if you don't think you'll store it or use it all, I say half it. Or call me up and I'll take some of it off your hands!


Tuesday, August 3, 2010

Personalized Table...Stand?

Recently I went to a wedding reception (congrats Amanda & Jadon) and decided that instead of buying something I wanted to make something.
HOWEVER, i take ZERO credit for this idea. I saw it on a blog...I just can't remember which one so I can't give the creator proper credit!

Supplies that you need:

*A picture frame (bigger frame would make a tray that would be good for breakfast in bed maybe?) I got mine at a 50% off Saturday at Goodwill, and it was already painted a color I liked!
*Scrapbook paper/embellishments/ribbon and such
*Hot glue
*Wooden letters. You pick the size.


First you decorate the paper inside of the picture frame. Mine was actually a piece of cardboard (I did get it at Goodwill after all) so it was pretty sturdy! I decided to put the bride/grooms last name on the inside to make it more personal, but any phrase, quote or single word would work.


Next cover the letters (I did W since their last name is Walters) with scrapbook paper. I just used a glue stick to glue them on. After that dries, hot glue them to the bottom of the frame.

Done!

Things I learned for next time:

*Make sure your letters are the same size before purchasing them. For some reason one W (yes I'm sure it was a W and not an upside down M) was abotu 1/4inch longer then the other. Took lots of sanding to get it to fit.

*If your not going to cover both sides of the letters w/ paper make sure the uncovered side isn't dirty/scratched or else you might have to paint it white to cover that up.

*I would also suggest gluing a dowel to connect the letters at the bottom, just for extra stability.

* Don't get mad if people say "what thats suppose to be".

*Hold the letters in place one at a time so that when the glue dries the letter is straight.

Sunday, July 25, 2010

Skillet Lasagna


Ingredients

2 lbs. Ground Beef
1 Onion
2 Cans (Petite) Diced Tomatoes (drained)
1 ½ (13.25 oz.) Jars Spaghetti Sauce
1 ½ boxes of Noodles (Bow Tie or Rotini)
2 Cups shredded Zucchini (optional)
1 (16oz.) Cottage Cheese
2/3 Cup Sour Cream
2 Cups shredded Mozzarella Cheese
Italian Seasoning
Salt & Pepper
Garlic Salt

Directions
-Cut onion and cook the ground beef and onion and in another pan cook noodles according to package instructions.
-After noodles are cooked, drain and drizzle with olive oil.
-If needed drain meat and then season meat according to taste.
-Combine ingredients in a pot & fold together and allow it to combine over low heat for about 5 minutes or until the cheese is melted.

(WARNING! This makes a lot. So you may want to cut it in half.)

Saturday, July 10, 2010

Quiche


Ingredients:
1/2 C. Butter
1 C. Flour
2 t. Baking Powder
24 oz. Cottage Cheese
2 (7 oz.) cans Green Chile
35 Egg Whites
6 C. Shredded Cheese (mozzarella, pepperjack)
1 bag/bunch Spinach
Salt, Pepper, Garlic Salt

Grease an 12x15 pan
Melt butter
Mix in flour and baking powder
Squeeze water out of steamed spinach and cut
Stir in the rest of the ingredients

Bake at 400 degrees for 15-20 mins then turn oven to 350 degrees and cook for another 35-40 minutes.

****** We did all egg whites to make it healthier and more low calorie. You can use a pie crust or crescent dough at the bottom for a crust. You can add whatever you want to taste. Like bacon or green onions. We have tried a few different things and its an easy recipe to add what you want. We have also made these in cupcake pans too {as you see from the picture}.

We make this much to freeze some. We cut the pan of quiche into bars and we put them in freezer bags. Then when we want them we just pull it out and cook it. Tastes great!!!

Try it and see how you like it!

Monday, June 21, 2010

Black Bean Brownies

THIS IS NOT A JOKE.
The following is a real recipe.


Take these 2 ingredients:


Drain and rinse the black beans. Put them in a blender/food processer along with 1 cup of water. Puree.

Mix the beans in with the brownie mix.
THATS ALL.
No eggs, oil, anything.


Taste the batter and wonder where the bean taste/smell has gone to.
Bake according the the box directions.
(actually took about 10 min longer then what it said)


Let them cool, then eat.
Then give them to your family but don't tell them what's different.
After you explain the ingredients prepare to defend yourself against accusations of trying to be "vegan".

Low calorie/Low fat brownies.
With lots of fiber.
That taste just like brownies.
Only different.
In a good way.
It has been decided that adding chocolate chips in wouldn't be such a bad idea either.
I dare you to try it.

Friday, June 18, 2010

Coconut Bread!

Coconut Bread

Ingredients:

4 eggs
1 cup oil
3 cups flour
2 cups sugar
2 teaspoons coconut extract
1/2 teaspoon baking powder
1/2 teaspoon baking soda
1/2 teaspoon salt
1 cup buttermilk
1 cup coconut flakes
1 cup chopped nuts

Directions:

1. set oven to 325 degrees and spray two loaf pans; set aside
2. cream eggs, sugar oil and coconut extract together.

3. blend dry ingredients together and add to creamed mixture; mix well
4. add buttermilk, coconut, and nuts until well blended
5. bake 45 minutes to an hour depend on oven.

Topping

Ingredients:

1/2 cup water
1 cup sugar
2 tablespoons butter
2 teaspoons coconut extract

Directions:

1. bring water, sugar and butter to a bil for approximately five minutes; stir constantly.
2. remove mixture from the stove and add the coconut extract

NOTE: When you take the coconut bread out of the oven, leave in pans, divide the topping and then pour over both breads. I suggest moving the bread from side to side to let all the topping soak in over the sides and bottom. Let it stand for three to four hours. After the tremendous wait, remove from the pans and wrap.

Soooooo good!!

Wednesday, May 19, 2010

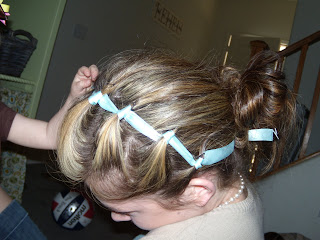
Hair Ideas!


So do you want to know how to do this fun hairstyle and many more?! Check out Becki over at Whippy Cake. Seriously you will be impressed with how easy her hair do's are!! Have fun!

Saturday, March 20, 2010

Pasta Salad

This is a mixture between a recipe I got from Samantha and what I ate at Paradise bakery. I love that you can adapt the recipe to what you like. So feel free to do the same!

Pasta Salad

Ingredients:
2 lbs. pasta
1 head/bunch broccoli
1 bottle Caesar Salad Dressing
1/4 of a red onion
cherry tomatoes
1 can olives
Parmesan cheese
Salt to taste

Directions:
Cook pasta according to instructions on bag
Once cooled mix all ingredients and chill

***you can add or change the additional ingredients according to what you like. Other ingredients you could use could include bell peppers and chicken. You can also change what type of cheese you use as well. So good and super easy!***

Angel Biscuits

Angel Biscuits - super easy and super good

Ingredients:
2 C. Bisquick
1/2 C. Sour Cream
1/2 C. 7-UP

Directions:
Mix sour cream and 7-UP together
Stir in Bisquick just until moist
DO NO OVER MIX
Drop batter by spoonfuls into cupcake pans.
Bake at 350 degrees for 10-12 minutes

{1 batch makes approx. 12 biscuits.}

Monday, March 1, 2010

Oreo Truffles

Family potlucks mean a chance to try out great new recipes. I found this little beauty here, and was dying to try it.
TURNED OUT AMAZING!!
Super simple and super delicious.

Oreo Truffles

1 package Oreos
1 1/2 pkg (12oz total) cream cheese softened. *I used 2 whole packages b/c well I love cream cheese!
12oz chocolate* I used a bag of semi sweet chocolate chips and a bag of milk chocolate chocolate chips and it was great!
1 oz white chocolate

1. Finely crush the oreos using a food processor
2. Mix oreos in a bowl with the cream cheese (I used a spoon to mix, not a blender). Mix until there are no white streaks visible.
3. Form into small balls
4. place on parchment lined baking sheet.
(hopefully no one pokes their fingers into the balls like they did to some of mine.)


5. Refrigerate for at least 2 hours or overnight * I did it overnight just to make sure they set correctly.
6. Melt chocolate over double boiler, stirring constantly.
7. Dip each truffle into chocolate using a spoon, drop onto parchment baking sheet.
8. Repeat.
9. Melt white chocolate. Pour into ziploc bag and make a tiny hole in the corner. Drizzle over chocolate.
10. Refrigerate until ready to serve * I would suggest refrigerating for at least 2 hrs prior to eating.
11. ENJOY!


NOTE: You should be aware that the chocolate can stick to your teeth when you bite into the goodness and therefore cause you to look like a pirate that is missing some teeth. Also, the chocolate can be a little melty when your eating them and you may not notice this until your putting your child into pajamas and notice little black fingerprints over his back.

Sunday, February 14, 2010

Picture Frame Clock

I got this great idea for a clock from my friend Kelsie{She's super crafty and even has two etsy shops. Here and hereAll you do is find picture frames--I got mine from Goodwill for about a dollar each--and then paint them black.  I added scrapbook paper and little embellishments that I had lying around the house in 8 of them, and then in 12, 3, 6 and 9, I put wedding pictures of my husband and me.  {It is, after all, for our master bedroom}   I found the clock hands online for about 15 dollars.  There are several places that sell them.  All you do is assemble everything, mount it on the wall, add a battery and voila!  Your very own personalized clock for less than $30.  This project was so much fun to make!  Definitely one of my favorites so far! 


P.S. Sorry about the crappy lighting. :)

Thursday, February 11, 2010

Jar-Vase

Have you ever tried to put a flower arrangement in a skinny vase, and THEY WOULDN'T FIT! It is really annoying. This was the problem facing me tonight. So, I was looking through my cupboards, deciding what I could use instead. I saw an empty glass jar, and thought, that might work. (If I make it pretty first:) So I got out my faithful jar of modge podge and found some cute scrapbook paper. Then I measured the paper and modge podged the paper to the jar. I added a second layer of paper with "Happy Birthday" on it. (Any saying would work.) Then I tied some ribbon around the top and I had a flower vase. (Now I don't have to buy one!!)


Monday, February 1, 2010

Miniature Shelf


This shelf was made for less than $5.00.
I just bought a plain shelf and painted it.
Then I modge-podged the paper to the shelf.
Voila, it is ready to hang up in our kitchen and hold our cute aprons we got at Disneyland!

Friday, January 29, 2010

Valentine's Advent

So we all know this one, right?  I saw this here and just had to do it for my hubby!  What you do is make 14 cards (I made 16 because I'm starting tomorrow).  On the back, you write an activity you and your spouse can do together that day.  The point is to bring you closer together in an inexpensive way.  There are lots of ideas listed in the link above.  I seriously did all mine in 45 minutes with my baby getting into everything (e.g. spilling modge podge in my carpet).  It's very easy and really fun!


(I was in a hurry, that's why 15 & 14 are in the wrong places.  Oops!)

Have fun crafting!

Wednesday, January 6, 2010

Potato Chip Cookies

Yes I know the name throws you off...just promise that you will give them a try...They are delicious! They are my brothers favorite cookie...{one of my favorites too}Potato Chip Cookies
Ingredients:
1 lb butter
1 cup sugar
3 1/2 cup flour
4 oz. crushed potato chips
1/2 cup nuts (optional)

Directions:
Cream butter and sugar till smooth.
Add the rest and Mix thoroughly
Drop from teaspoon on ungreased cookie sheet.
Bake at 350 degrees for 15-20 minutes
When cool...give them a dunking in powdered sugar.

--I don't ever recall doing these with nuts. But I think they would be good that way too. Make sure the cookies are completely cool before tossing them in a bag of powdered sugar. --

Now GO make them!